Categories
Ad Hoc beef Best of Inuyaki recipes Thomas Keller

Cook the Book: Ad Hoc at Home – Blowtorch Prime Rib

When I first saw the Blowtorch Prime Rib recipe in the Ad Hoc at Home cookbook, I knew I was going to make it for Christmas dinner. But this technique is so easy, there is no reason to save it for special occasions.

Blowtorching Prime Rib
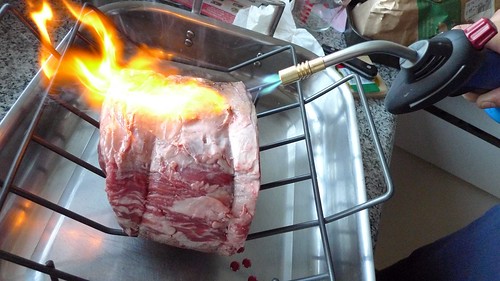
Blowtorching meat is fun!

Of course, the first step is actually buying a blowtorch, and there are several options available. My first choice was the Iwatani Professional Torch Burner because it’s compact and just plain looks cool. The butane cartridges are proprietary, but with all the Asian markets near me, they’re not hard to find. Being the chronic procrastinator that I am, I had to settle for what was available down the street at Lowes. The BernzOmatic TS3000 was cheap (~$26), came with a big can of propane called the “Fat Boy,” and I love the name BernzOmatic. :)

The BernzOmatic TS3000
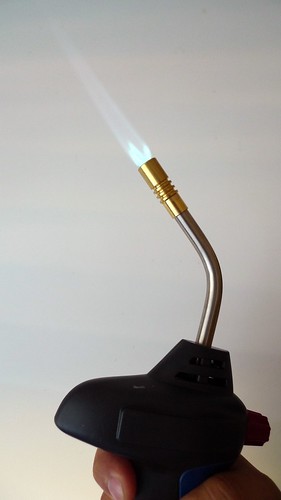
The lovely blue flame produced by the BernzOmatic TS3000.

Roasting the prime rib can be broken down to three steps. I used a 2-bone, 4½-pound standing rib roast that easily fed 6 adults, but you could use this technique with any size roast.

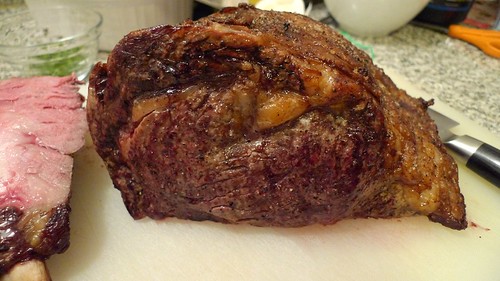
  1. Place the rib roast on a rack in a roasting pan and sear the meat with the blowtorch until it starts turning gray and the fat starts rendering.
  2. Season the rib roast with generous amounts of kosher salt and coarsely ground black pepper.
  3. Roast in 275F oven until the meat reaches an internal temperature of 128F. For our 4½-pound roast, this took about two hours. I use a digital probe thermometer so that I can monitor the temperature of the meat without opening the oven.
Out of the Oven, Bones Removed
The blowtorch jumpstarts the development of the crust
that’s characteristic of good prime rib.

Roasting the meat at a low temperature ensures a beautiful shade of pink all the way through the meat. Rest the meat for at least 30 minutes before cutting into it.

Perfect Medium Rare
Perfect medium rare after resting for 40 minutes.

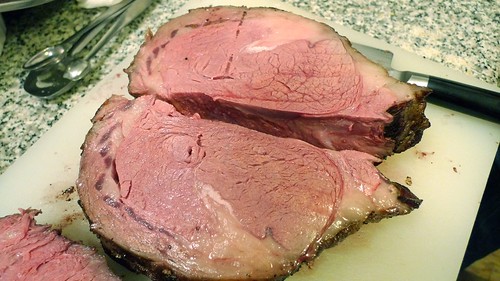
Since everything at Ad Hoc is served family style, the prime rib is cut into thick chunks instead of more traditional individual slices. I think this allows a smaller rib roast to serve more people and cuts down on wasted meat, especially if there are light eaters at the table who can’t finish a whole slice of regular prime rib.

To serve the meat, cut the roast in half down the center and put the meat cut side down on the cutting board. Then cut each half into ½-inch slices. I think serving the meat this way is great because each piece is thick and has a lot of crust. Before bringing the meat to the table drizzle it with a little fleur de sel or kosher salt and some coarsely ground pepper.

Blowtorched Prime Rib with Horseradish Cream 
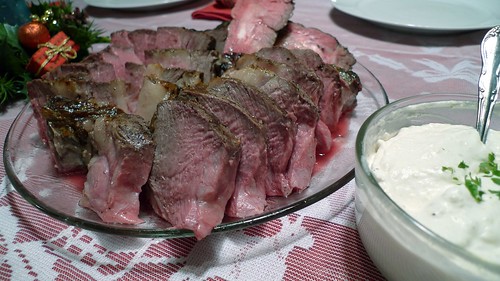
Blowtorched prime rib with horseradish cream

The low cooking temperature means that there’s hardly any drippings in the bottom of the pan to make jus, but you don’t need it. The meat’s beefiness comes through loud and clear, and it goes beautifully with this horseradish cream.

Horseradish Cream (adapted from Ad Hoc at Home)
½ cup very cold heavy cream
2 tablespoons sherry vinegar
¼ cup drained, prepared horseradish
½ teaspoon kosher salt, or to taste
½ teaspoon freshly ground black pepper, or to taste

Put the heavy cream and vinegar in a bowl in a medium bowl and whisk until the cream and holds a soft shape (just before soft peaks). Whisk in horseradish, salt, and pepper until smooth. Cover and refrigerate for up to a week.

Categories
barbecue beef Korean recipes street food

Korean BBQ Tacos

Kalbi Tacos v2.0
Kalbi Taco (actual size at 1440×900 MacBook Pro resolution)

Korean BBQ tacos have been a street food phenomenon since LA’s Kogi BBQ trucks started drawing hundreds of hungry Angelenos to street corners around Southern California. Kogi’s popularity spawned a blatant knock-off, inspired others to start their own mobile food ventures, and compelled other Korean establishments to add Korean tacos to their menus, such as SF’s Seoul on Wheels, Namu, and John’s Snack and Deli, and NY’s Seoul Station). For food bloggers, creating our own version of the dish we don’t have easy access to becomes a fun little project.

Seoul on Wheels - Korean Tacos
Seoul on Wheels’ Korean tacos at Oakland’s Eat Real Fest 2009.

I set out trying to emulate the famous Kogi taco, and this led me in several directions. I focused specifically on kalbi tacos since I’ve always been a big fan of grilled Korean short ribs. In the past, I’ve relied on jarred marinades, but this time I wanted to make one from scratch. I put out a call for recipes on both Twitter and Facebook, and my friend Kevyn came through with an excellent kalbi marinade. Feel free to use your favorite kalbi recipe if you have one.

The question of corn v. flour tortillas doesn’t exist here because tacos should ALWAYS be on corn tortillas, but tortilla size is an important issue. I used 4-inch tortillas because it makes the tacos easy to pick up and eat one handed. However, the smallest tortilla that is carried by most mainstream American supermarkets is 6 inches in diameter, which I generally find too big and unwieldy for taqueria-style or street tacos. If you have Mexican market nearby, 4-inch tortillas shouldn’t be hard to find.

Figuring out the rest of the taco required a lot more research. I started at SteamyKitchen.com and Jaden’s recipe for Korean-style Kogi Tacos, which includes a BBQ sauce recipe developed for her by Kogi Chef Roy Choi. The Kogi BBQ sauce is intended to go with pork or chicken, but I think it works really well to balance out the rest of flavors in the taco. Tasty Eats at Home did her own version of Korean tacos, and I used her cilantro-red onion relish for this recipe. I like the color and flavor that the red onion provides over brown or yellow onions. The last major topping is napa cabbage/romaine slaw dressed with a chili-soy vinaigrette that I lifted from the New York Times.

I ended up making the tacos based on the recipe that follows three times, and by the third time, we pretty much had all the logistics down. I also made some other Korean taco variations a few days ago, and you can see those at the end of the post.

INGREDIENTS AND RECIPES
4-5 pounds of flanken-style short ribs
4-inch corn tortillas, 1 bag (at least 40)

Kalbi Marinade
adapted from a recipe by Kevyn Miyata
(for 4-5 lbs of short ribs)

1½ cups soy sauce
¼ cup sugar
¼ cup honey
¼ cup sesame oil
8-10 cloves of fresh garlic, crushed
6 large green onions, roughly chopped
1 Asian or Korean Pear (½ roughly chopped, ½ sliced then mashed by hand)
Toasted sesame seeds

Combine all ingredients except meat in a bowl and mix well. In a one gallon ZipLoc bag, combine meat and marinade. Let sit for 24-36 hours, flipping over the bag every 12 hours or so to ensure the marinade is distributed evenly.

Kogi BBQ Sauce
adapted from Steamy Kitchen
3 tbsp sugar
2 tbsp gochujang (Korean fermented hot pepper paste)
2 tbsp soy sauce
2 tsp sesame oil
1 tsp rice vinegar
Sriracha to taste (optional)

Whisk together all the ingredients. If desired, add Sriracha a few drops at a time to the sauce until it’s hot enough for ya. :) If you have one, put sauce in a squeeze bottle to make taco assembly more efficient.

Cilantro-Onion Relish
adapted from Tasty Eats at Home
½ red onion, minced
1 tsp rice wine vinegar
1 tbsp cilantro
Juice of 1 lime
Pinch or two of salt

Add onions and rice wine vinegar in a bowl. Allow to sit for about 5-10 minutes. Drain and rinse. Add rest of ingredients to onions and stir to combine.

Napa/Romaine Slaw with Chili-Soy Vinaigrette
dressing recipe from The New York Times
2 cups Napa cabbage, shredded
4 cups Romaine lettuce, shredded
¼ cup soy sauce
2 tsp rice vinegar
1 clove garlic, peeled and minced
2 small jalapenos, seeded and minced
1 tsp minced fresh ginger

Whisk together the soy, vinegar, garlic, jalapenos and ginger and set aside. Combine Napa and Romaine in a bowl until mixed well. You should have a nice green/white color contrast. For best results, divide slaw into batches and dress each batch as needed so that the greens don’t get soggy.

DIRECTIONS

  1. Grill short ribs about a minute per side on a really hot grill.
    Grilling Kalbi
  2. Separate the kalbi meat from the bones and gristle. Cut the meat it into strips lengthwise, then turn 90-degrees and dicing the meat into a “brunoise” of kalbi, if you will. :) If you like the gristle, I’d separate that from the bones and dice it up too. Set the meat aside in a bowl until there’s enough meat to start making tacos en masse.
    Kalbi "brunoise" :P
    Kalbi “brunoise”

    OPTION: After all the meat is diced up, you can either use it straight away or refry it to caramelize the meat so that each piece has a little crunch to it. This extra step is also good if you’re going to use the gristle since it lets it break down a lot more. I’ve done it both ways, and the extra caramelization is really nice.

  3. Heat a lightly oiled cast iron skillet over medium heat. Toast tortillas 30-45 seconds on each side and set aside. Working with a partner or two in an assembly line works great here so tacos can be made right after toasting.
  4. Start assembling the tacos by putting a little meat in the tortilla, then top with a bit of the cilantro-red onion relish, a little slaw, a little more cilantro-onion relish, and then drizzle a little BBQ sauce to finish. We eyeballed all of these amounts, but don’t overstuff the taco or else it will too hard to pick up and eat. You can arrange about eight tacos per plate.
    Kalbi Tacos

VARIATIONS

  • Replace the cilantro-onion relish with a pickled radish/carrot salad (known colloquially as “mu,” if anyone knows what this is actually called in Korean, I’d love to know.) This was my second-favorite version of the taco that we made.
    Bulgogi Tacos 2.0
  • To go even more Korean, I stole an idea from my friend Euge and blended up a jar of kimchi to make a Korean salsa that replaced the Kogi BBQ sauce. I’m not a big kimchi eater, but I liked this a lot. If you like kimchi, this is a great alternative.
    Bulgogi Taco

I’m not sure how many tacos this actually makes because we’ve never had to use all the meat for tacos, and it’s never a bad thing to have extra kalbi around. :) I do know that you can get at least 40 tacos out of 4-5 pounds of meat. You can easily scale this recipe down for your own needs, but I was cooking for parties and needed a lot of food.

Categories
beef recipes sandwiches

The Pastrami Project

Short Rib Pastrami
Pastrami made with a short rib slab. (second attempt)

Pastrami is one of my favorite things to eat in the whole world, but it never occurred to me that I could actually make it myself until I read Asian Jewish Deli’s Pastrami Reuben post. What caught my attention was that AJD used a slab of short ribs instead of the more traditional brisket or beef plate that is used to make pastrami, and short ribs are my favorite part of the cow.

Pastrami (brisket)
Pastrami made with brisket.

A couple months later, I was reading through Michael Ruhlman’s Ratio and in the chapter on brines, I saw a recipe for corned beef with an additional pastrami variation. I decided I would give that version a shot, especially since the dutch oven bread I made previously from Ratio turned out to really well. Ruhlman recently posted his version of short rib pastrami using regular boneless short ribs, but I kinda took the wind out of his sails a bit when I mentioned AJD’s version to him on Twitter a couple days before it went online.

Pastrami (short rib)
Short rib pastrami made with a standard cut
of boneless short ribs. (first attempt)

The pastrami-making process is broken down into three steps: curing, smoking, and steaming. Curing is basically how you make corned beef. When you smoke and steam corned beef, you get pastrami. In fact, if you bought a prepackaged corned beef at the market, you could easily make this into pastrami, but I’d bet that doing it yourself will yield a better result.

Curing takes four days and is usually done with a wet cure, i.e. brine. Ruhlman prefers brining, especially for larger cuts of meat like a brisket. I also saw some examples on other Web sites where a dry cure didn’t penetrate all the way to the middle of the meat, so I decided to stick with a brine. After brining, the meat is rinsed, dried and then coated on all sides with a ground pepper/coriander rub before it is smoked and steamed.

Pastrami (brisket) sandwich
Brisket pastrami sandwich (first attempt).

The first pastrami I made used a brisket point, and it was good, but not as salty as I expected it to be. I also had a couple pieces of boneless short ribs that I threw on the brine, and those smaller pieces of meat were closer to the flavor I was looking for. Upon reviewing the recipe in Ratio, I found a typo in the recipe that affected the ratio of water to salt. I guess I could have figured out the math since tere is a specific ratio for brines, but math was never my strong suit. ;-) I mentioned the discrepancy and verified the correct ratio with Ruhlman via Twitter and proceeded to make a second pastrami a couple weeks later.

Since my goal at the outset was to make short rib pastrami, I set out to find some a slab of short ribs for the second attempt. I found one at Baron’s Meats in Alameda, but if you can’t get your hands on one, you can simply use boneless short ribs since these are easy to find at your market or butcher. Also, since boneless short ribs are smaller, they’re much easier to handle than a short rib slab or an unwieldy brisket.

PASTRAMI RECIPE
adapted from Michael Ruhlman’s Ratio
This version of the recipe corrects the typo in the first edition of Ratio and converts the corned beef recipe into dedicated pastrami variation.

INGREDIENTS
1 4-5 pound brisket, short rib slab, or boneless short ribs.

Brine
2 liters water (half gallon)
25 grams of pink curing salt* (1 ounce or 5 teaspoons)
50 grams sugar (1¼ ounces or scant ¼ cup)
100 grams kosher salt
10 cloves garlic, flattened with the flat side of a knife
1 teaspoon whole black peppercorns
1 teaspoon yellow mustard seeds
1 teaspoon coriander seeds
1 teaspoon dried red pepper flakes
1 teaspoon whole allspice
½ teaspoon ground nutmeg
1 cinnamon stick, crushed or broken into pieces
3 bay leaves, crumbled
1 teaspoon whole cloves
½ teaspoon ground ginger

* The key to preserving pastrami’s familiar red color is using pink curing salt (i.e. sodium nitrite). You can order it online at butcher-packer.com. You can omit it, but the pastrami will be brownish gray instead of red.

Dry Rub
Equal parts ground pepper and ground coriander, preferably freshly ground (enough to cover the meat)

DIRECTIONS
In a pot large enough to hold the entire piece of meat, combine all the brine ingredients in a large pot. Simmer and stir until the salt and sugar are dissolved. Remove from heat and cool to room temperature before refrigerating. When the brine is completely chilled, place the meat in the pot. Use a plate to keep the meat submerged, if necessary. Refrigerate for four days.

Remove the meat from the brine and rinse well. Dry the meat and then cover completely it in the pepper/coriander rub. Smoke the meat until the internal temperature of the meat is 165F. This will take a couple hours or so. After smoking, steam the meat for a couple more hours until tender.

If you’re eating the pastrami right away, you can remove it from the steamer and start slicing it up. If you’re not serving the pastrami right away, you can let it cool and then wrap it up in plastic wrap and refrigerate it. Cooling the pastrami also makes it easier to slice thinly if that’s how you like it. Whether you keep it whole or slice it up, steam the pastrami for 5-10 minutes to warm the meat and give it a bit more moisture before serving.

I normally prefer a traditional New York-style sandwich of pastrami on rye bread with brown deli mustard or a pastrami reuben with melted and sauerkraut (as pictured above).

Categories
beef Best of Inuyaki Filipino recipes

Making Tapa with Dad

Ready to broil...

Tapa is Filipino cured beef that is similar to beef jerky, and when I was home last weekend, my dad was raving about the homemade tapa he started making recently. He was eager to show me how it’s done, so I pulled out my camera and followed him step by step.

  1. Dad uses three pounds of thinly sliced sirloin tip steaks that he gets at the local Mexican supermarket and cuts it into equal-sized strips with scissors.
  2. Cut into Strips
  3. Next, he marinates it for 10 hours in a basic mixture of vinegar, soy sauce, garlic and sugar.

    Tapa Marinade
    ½ cup soy sauce
    ½ cup vinegar
    6-8 garlic cloves, chopped
    1 Tbsp. sugar

  4. Marinated for around 10 hours
  5. After marinating, the meat gets layered in a food dehydrator that will run for 12 hours. A dehydrator simplifies the process of making tapa, but if you don’t have one, you can always use Alton Brown’s box fan method, which Burnt Lumpia did when he made his tapa. I don’t have a dehydrator, but I do have a box fan, so I’m going to use this method next time.
    Dehydrate for 12 hours
  6. After 12 hours, the tapa looks like this…
  7. All dried out...
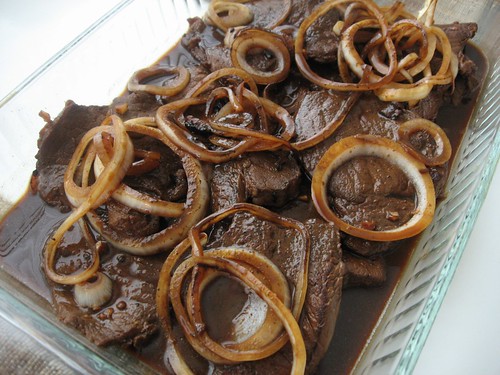
If Lisa Lisa saw this, she’d say it was “all dried out.”
  8. My dad is insistent on broiling the tapa for two minutes a side because I think he’s averse to frying in general, but frying the tapa in a little oil is a great way to finish it off before serving. One of the most popular ways to enjoy it is for breakfast in tapsilog (tapa, garlic fried rice (sinangag) and eggs (itlog)), which is how I like to eat it.
  9. Homemade Tapsilog
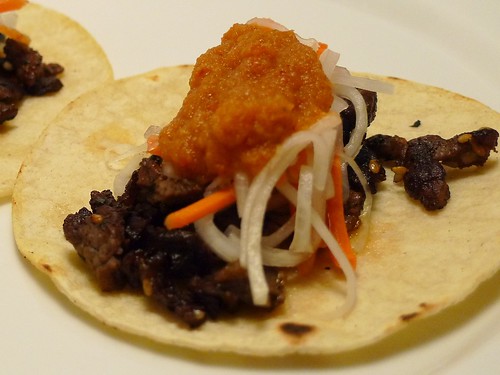
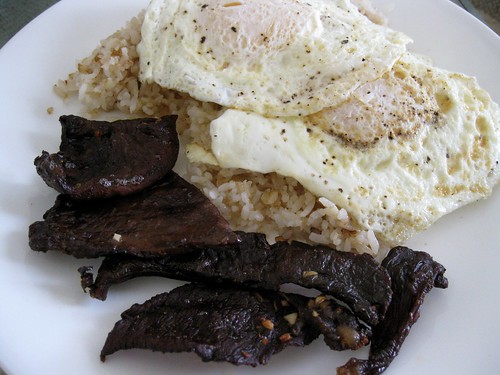
Tapsilog with Dad’s Homemade Tapa.
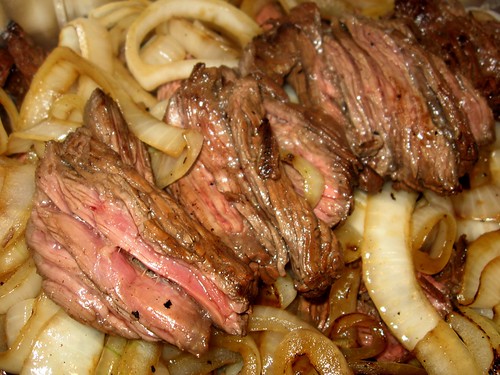
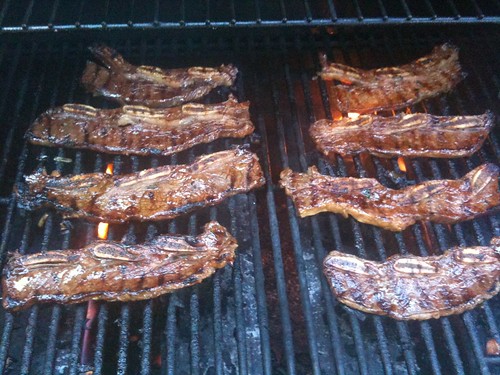
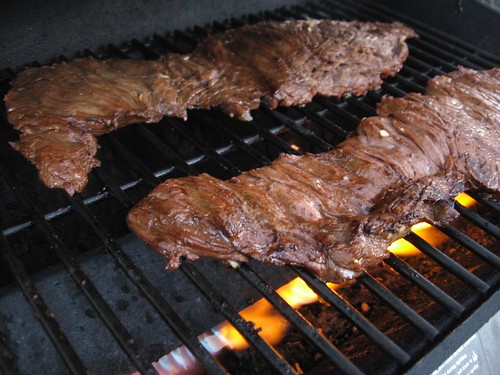
Last weekend I was home attending my high school reunion, so I’m not going to be home for Father’s Day this year. When I was a kid, it was my dad’s garlic fried rice that woke me up on Sunday mornings, and when I was out on my own, trying to replicate that simple dish was one of the reasons I started cooking. My mom had a stroke five years ago, and dad has been responsible for taking care of her—cooking all the meals, making sure she’s exercising and doing her therapy, and more importantly, keeping her smiling and laughing.

So this post is for you, dad. Happy Father’s Day, and I can’t wait to hear more of your culinary secrets.

Categories
beef Bistek Tagalog Filipino recipes

Bistek Tagalog 3.0 (Grilled Version)

Thanksgiving was at my cousin’s this year, and we both agreed we didn’t want to do turkey. I decided that I would make a big batch of Bistek Tagalog, only this time (and inspired by Marvin at Burnt Lumpia) I was going to grill it. Bistek is great as a traditional single-pan dish, but I was confident that grilling the steak would make it even better.

Grilled Bistek

Unlike previous versions of bistek I’ve made that used thinly sliced New York or sirloin steaks, I picked up some flap steak at Costco. Flap steak is very similar to skirt steak, cooks quickly, and is extremely tender. Again, you can use almost any cut of steak to make bistek, but I think that skirt, flank, or flap steaks might be the best cuts of meat for this dish.

I used the same methods as in Bistek Tagalog II (Kalamansi version). I got some more kalamansi from our family friend and ended up needing 60 of them to get almost 1.5 cups of juice. I mixed this with a cup of soy sauce (to ensure there was proportionally more juice than soy sauce) and four chopped garlic cloves to finish the marinade. The meat should be marinated for no more than an hour before putting them on the grill. (Make sure you save the marinade to make the sauce later).

Grilled BistekOn the Grill

I grilled them for about 5 minutes a side on a very hot grill and then rested the meat for 10 minutes before slicing it against the grain. The meat ended up being between medium rare and medium, which is exactly what I was looking for.

Grilled Bistek
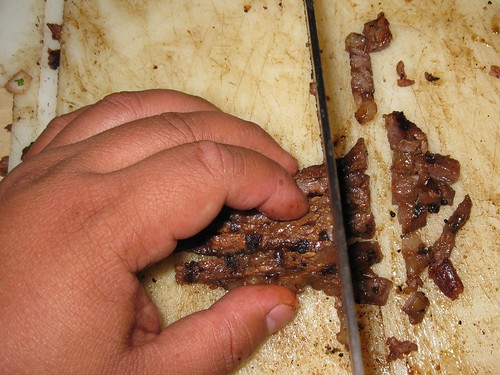
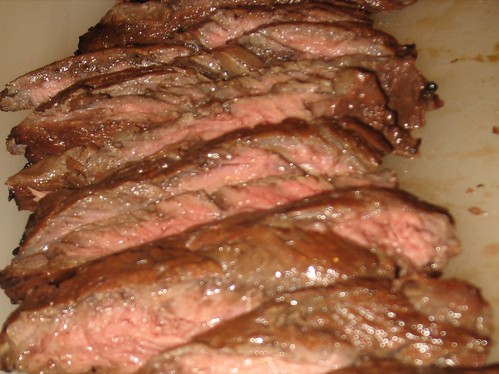
Slice against the grain.

I had a bit of trouble getting the onions onto skewers, so I just put them directly on the grill. I lost a bit of onion this way, but for the most part it worked well. I’m sure you could fry up the onions in a hot, dry frying pan or grill pan if you want to maximize your onion yield. :) When you’re done cooking the onions, mix it up with the meat.

While the meat rests, take the remaining marinade and cook it down to your desired consistency to make the sauce. You might find that you don’t even need the sauce after you try the meat, but it’s always good to mix it in with your rice, too. We ended up pouring the sauce into a gravy boat so that people could just pour it on the meat if they wanted.

Of the three different bistek’s that I’ve made, this one is by far my favorite. Grilled meat always trumps pan-fried in my book, and the flap steak was also the ideal cut of meat to use for bistek. A pan-fried flap steak would also be excellent, but if you have access to a grill, by all means use it.

How did it go over at Thanksgiving? The bistek was the first platter to be finished off, and I also got several compliments on it, so it went very well. :)

Hope everyone had a great Thanksgiving weekend…now it’s time to focus on Christmas dinner!

Categories
beef Best of Inuyaki Bistek Tagalog Filipino recipes

Bistek Tagalog 2.0 (Kalamansi version)

We’ve been cooking a lot for my parents this week, and when my mom showed me the bags of kalamansi (Philippine musk lime) she got from her friends, the first thing I thought of making was Bistek Tagalog (Filipino Beefsteak).


Bistek Tagalog

The first time I wrote about this, I only had lemons on hand, but kalamansi is the traditional ingredient.

Kalamansi

Kalamansi are really small, and I think I used at least 30 kalamansi (I lost count) to get 1 cup of juice. The kalamansi juice is mixed with soy sauce and minced garlic and used to marinate the steak for about 30 minutes.

My mom said that the bistek she grew up with a had a strong citrus flavor, so instead of the 1:1 citrus/soy sauce mixture that I used before, I reduced the amount of soy sauce to let the kalamansi juice come to the forefront.

When my mom tried my bistek, she said it reminded her of home, which was the ultimate compliment.

Categories
beef Italian recipes

Italian Meatballs

Recipe courtesy of Toni’s Garden.

INGREDIENTS
1 1/2 lbs. ground beef 15% fat (anything less than that is too dry and has no flavor)
1/2 lb. ground pork
2-3 cloves of garlic chopped fine or pressed
2 eggs
1/2 cup grated romano cheese (good cheese is a requirement, no cheating here)
1/4 cup chopped fresh Italian flat leaf parsley
1 cup dried plain breadcrumbs (home made if possible)
just a couple of grindings of black pepper—not too much at all

DIRECTIONS

  1. Preheat oven to 450F.
  2. Combine all ingredients except bread crumbs. Mix thoroughly.
  3. Pour breadcrumbs over the top of the meat mixture and sprinkle with a little water to moisten, about 1/4 cup.
  4. Mix together until combined.
  5. Roll 1-inch diameter meatballs with your hands. If you want to make them more uniform, use a 1-inch scoop.
  6. Place all the meatballs evenly spaced in a baking dish and cook for about 15-20 minutes or until brown.