Categories
Best of Inuyaki dessert Filipino street food

Puto Bumbong

Puto Bumbong is a Filipino delicacy that’s traditionally served during the Christmas season in the Philippines. It literally translates to steamed glutinous rice (puto) cooked in bamboo (bumbong), and it’s a staple at my best friend’s house, where we gather for Noche Buena at midnight on Christmas Eve. The purple color comes from the mixture of sweet rice and black rice (pirurutong), but I’ve seen recipes that call for purple food coloring, which is obviously cheating! Puto bumbong is served with butter, sugar and freshly grated coconut on top. I asked my friend’s mom if she would show me how to make puto bumbong, and she was happy to oblige.

Puto Bumbong
Dave Chappelle says “I want that purple stuff!”

Cooking puto bumbong is fairly quick but preparing the rice is a three-day process. On the first day, you take a mixture of equal parts of sweet rice and pirurutong and soak it overnight. On the second day, you take the mixture and grind it in a blender. (In the Philippines, you’d traditionally use a grinding stone of some kind.) Then the mixture is placed in a cotton sack (like a flour sack) for another day in order to drain any excess water. Since it’s generally warm at Christmastime in the Philippines, you’d simply hang the bag outside and let gravity do the work. With the colder winters here in the States, better results are obtained by putting a heavy weight on the bag to force the excess water out.

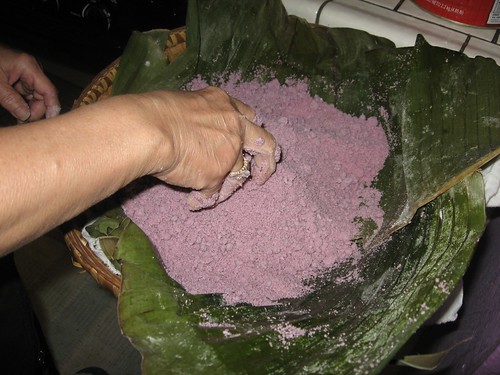
The rice mixture should be ready the next day, and it should be moist, not dry. The next step is to use your hands to mix it up and break up any clumps.

Purple Rice Mixture
Clumps are bad.

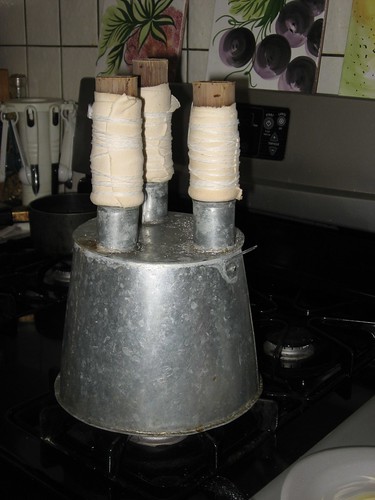
To cook the puto bumbong, you need a special steamer. This one has three holes on top so that the steam can escape and cook the puto in the bamboo. The cloth wrapped around the bamboo helps prevent burnt hands.

Puto Bumbong Steamer

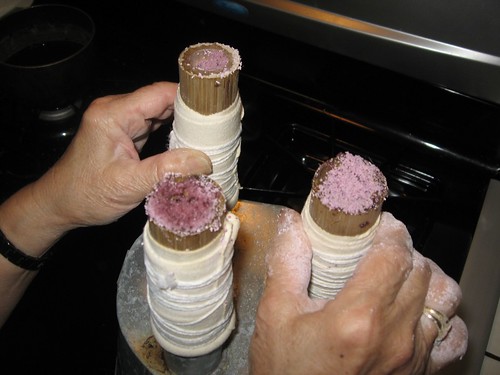
Simply fill up the bamboo with the rice mixture and put it on top of the steamer. You can tell when it’s done when the rice turns dark purple and kind of shrinks into the bamboo.

Three Different Stages of Doneness
Clockwise from top: almost done, just started (light purple), and finished (dark purple).

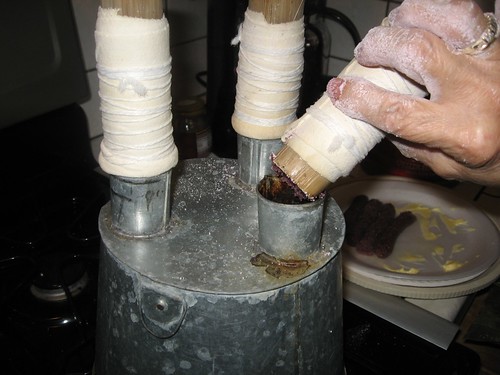
Before you remove the puto bumbong from the bamboo, hold the top of the bamboo over the steam to finish cooking the end that was farthest away from the steam.

Finishing the Ends...
Finish off the tip.

To remove from the bamboo, hold the bamboo in your left hand…then hit the pinky side of your left hand against your right palm by the base of your thumb. The puto bumbong should plop onto plate.

Puto Bumbong with Butter
Lots of butter is very important!

To finish, slather the puto bumbong with butter and then top it with freshly grated coconut and sugar (either white or brown). In the Philippines, puto bumbong is sold by street vendors after Mass during Christmas week and is wrapped in banana leaves so customers can take it with them. Since we normally enjoy these at home, we just eat it fresh from the steamer…no banana leaves required.

Thanks to my Tita Lety for showing me how this delicious Christmas treat is made. It’s always great going to their house on Christmas Eve for Noche Buena just a few hours after finishing our own Christmas Dinner.

Categories
Ad Hoc beef Best of Inuyaki recipes Thomas Keller

Cook the Book: Ad Hoc at Home – Blowtorch Prime Rib

When I first saw the Blowtorch Prime Rib recipe in the Ad Hoc at Home cookbook, I knew I was going to make it for Christmas dinner. But this technique is so easy, there is no reason to save it for special occasions.

Blowtorching Prime Rib
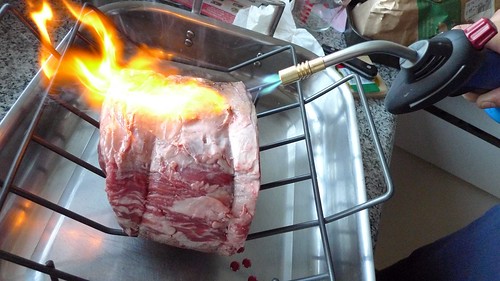
Blowtorching meat is fun!

Of course, the first step is actually buying a blowtorch, and there are several options available. My first choice was the Iwatani Professional Torch Burner because it’s compact and just plain looks cool. The butane cartridges are proprietary, but with all the Asian markets near me, they’re not hard to find. Being the chronic procrastinator that I am, I had to settle for what was available down the street at Lowes. The BernzOmatic TS3000 was cheap (~$26), came with a big can of propane called the “Fat Boy,” and I love the name BernzOmatic. :)

The BernzOmatic TS3000
The lovely blue flame produced by the BernzOmatic TS3000.

Roasting the prime rib can be broken down to three steps. I used a 2-bone, 4½-pound standing rib roast that easily fed 6 adults, but you could use this technique with any size roast.

  1. Place the rib roast on a rack in a roasting pan and sear the meat with the blowtorch until it starts turning gray and the fat starts rendering.
  2. Season the rib roast with generous amounts of kosher salt and coarsely ground black pepper.
  3. Roast in 275F oven until the meat reaches an internal temperature of 128F. For our 4½-pound roast, this took about two hours. I use a digital probe thermometer so that I can monitor the temperature of the meat without opening the oven.
Out of the Oven, Bones Removed
The blowtorch jumpstarts the development of the crust
that’s characteristic of good prime rib.

Roasting the meat at a low temperature ensures a beautiful shade of pink all the way through the meat. Rest the meat for at least 30 minutes before cutting into it.

Perfect Medium Rare
Perfect medium rare after resting for 40 minutes.

Since everything at Ad Hoc is served family style, the prime rib is cut into thick chunks instead of more traditional individual slices. I think this allows a smaller rib roast to serve more people and cuts down on wasted meat, especially if there are light eaters at the table who can’t finish a whole slice of regular prime rib.

To serve the meat, cut the roast in half down the center and put the meat cut side down on the cutting board. Then cut each half into ½-inch slices. I think serving the meat this way is great because each piece is thick and has a lot of crust. Before bringing the meat to the table drizzle it with a little fleur de sel or kosher salt and some coarsely ground pepper.

Blowtorched Prime Rib with Horseradish Cream 
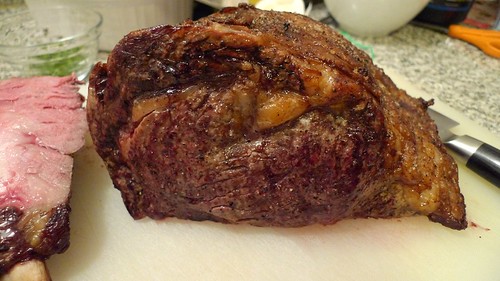
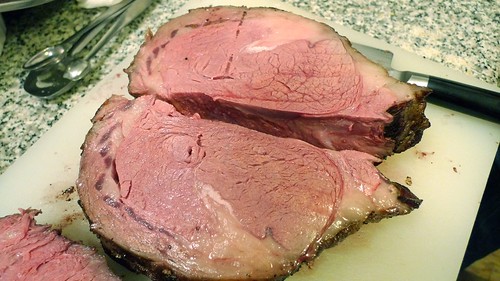
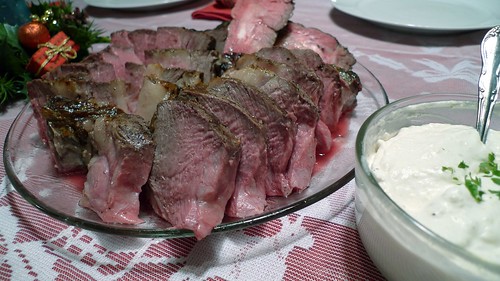
Blowtorched prime rib with horseradish cream

The low cooking temperature means that there’s hardly any drippings in the bottom of the pan to make jus, but you don’t need it. The meat’s beefiness comes through loud and clear, and it goes beautifully with this horseradish cream.

Horseradish Cream (adapted from Ad Hoc at Home)
½ cup very cold heavy cream
2 tablespoons sherry vinegar
¼ cup drained, prepared horseradish
½ teaspoon kosher salt, or to taste
½ teaspoon freshly ground black pepper, or to taste

Put the heavy cream and vinegar in a bowl in a medium bowl and whisk until the cream and holds a soft shape (just before soft peaks). Whisk in horseradish, salt, and pepper until smooth. Cover and refrigerate for up to a week.